Use the Doc Mgmt action type to manage document workflow (such as all documents needed for close).
NOTE: A Document Management task may only contain and manage a single document for document revisions. Use task attachments if several files are required for a task.
Preparers can create, check in, publish, and modify the documents. Approvers can only publish documents, so they can be reviewed before approval is given.
Select a Doc Mgmt task in the Task Details dialog box to display its details on the bottom half of the screen. When you click Execute, the Document Management menu bar displays.

Document Management Menu Bar

Check-In
Use this to check in a document from your local computer.
-
Enter a check-in comment and click Check-in.
-
Navigate to and select the document and click Open.
History
Opens the Check-In History dialog box to check-in a document version previously used, that is currently stored in history.
Check-Out
Use to check out a version of the document.
Undo
Use to undo document version checkout.
Publish
Use to publish the checked-in version of an XFDoc.
Delete
Deletes the document and all historical instances of the document associated with the selected task.
Document Management Processes
See:
Create a Document
-
Open Word and create the document containing the information related to the task.
OneStream software components are added to the document with the XFDoc Builder Add-In during check-out.
-
Save the document and note its location.
NOTE: Documents inserted into other documents must be saved with .xfDoc as part of the file name, for example SouthHoustonSales.xfDoc.docx for a Word document. Documents not stored in this format cannot be inserted in other documents
-
Close the document.
Check In and Publish a Document
-
Click Check-In and enter a related comment In the Check-in dialog box. Click Check-in.
-
Use Windows Explorer to navigate to the location of the file being Checked-In (created in the previous section) and select it.
NOTE: Documents being checked in must be closed before checking them in. An error occurs if the document is still open.
-
Click Open to check in the document. The document displays in the task, with a status of CheckedIn. The document displays a green check in the In column to indicate it is checked in.

The document is ready to be published if the document does not need any XFDoc components added. Continue to the next step.
See Check Out and Publish a Document for instructions if you are adding XFDoc components to this newly published document.
-
Select the newly checked-in document, then click Publish. The document opens and displays in the program associated with the file type.
IMPORTANT: Published PowerPoint xfDocs do not open in their associated program when using the Modern Browser Experience
-
Close the document. The status of the document is still CheckedIn and it has a green check in the In column.
NOTE: Document file name suffixes change from .xfDoc to .xfTmp when checked in.
![]()
Check Out and Publish a Document
If the document needs to be updated, it must be checked-out, edited, checked-in, and republished. The XFDoc Builder add-in must first be installed as a Word add-in before using it in Word.
-
Click Execute to execute the task for the document needing updates.
-
Select the document version to be updated, then click Check-Out. The document opens in the file's default File Viewer.
-
Make any required changes needed to the document.
If not adding components, proceed to step 7. Otherwise, proceed with the next step.
NOTE: The XFDoc Builder add-in must first be installed as a Word add-in before using it in Word.
See XFDoc Add-Ins Settings for information on adding the XFDoc Builder add-in.
-
In Word, click Add-ins, then click the XFDoc Builder button.
-
Use the OneStream XFDoc Builder dialog box to insert components. Double-click the content types to add them to the list of content items, and then click Insert.
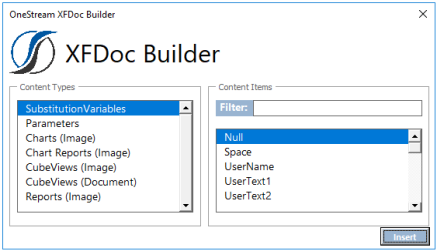
The document updates with the selected component information.

While the document is checked out for editing, the extensible functionality is not processed, due to the .xfTmp in the file name. While editing the document, the extensible code is visible, not the actual data.
-
Save the document. When saving the document in the same file location with its previous name, select the Replace file option when prompted. The document automatically saves with .xfTmp added to the file name.
-
Close the document.
-
Complete the steps documented in Checking-In/Publishing a Document to check the document back in and publish it. When published, the document contains information based on the components added and the formulas entered.
Provide an explanation of what changed in the Comment field. Both versions of the document display in the Document Management list.

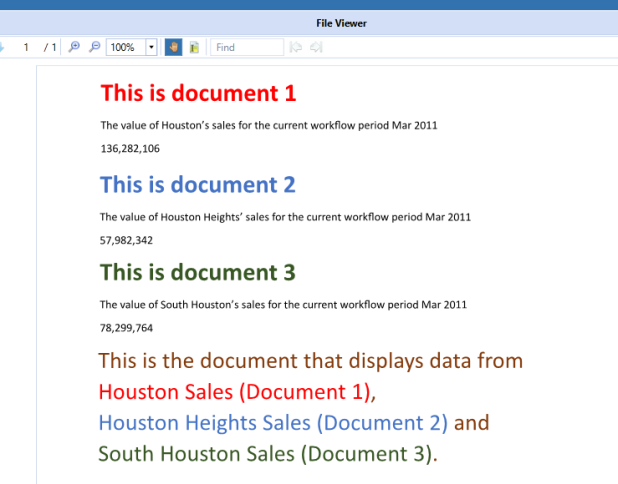
Create a Combined Extensible Document
You can create a single document to display data from multiple source documents. Each of the source documents must have .xfdoc in the file name, be associated with a specific task, and already be checked-in and published. Then you can combine multiple documents into a final document. There must also be a task that creates and publishes the combined extensible document already created.
NOTE: Combining one Word document (Doc Management) task inside of another Doc Management task (Word Document) using a version of Microsoft Word 2010 or earlier is not supported.
-
Create a blank document in Word to contain the combined documents.
-
Enter the appropriate information into the document.
-
Save it and note the location.
-
Launch the task for publishing combined documents.
-
Check in the document created in step 1 of this procedure.
-
Select the document that was just checked in and click Check-Out. A window displays with options for the file being checked out.
-
Click Open.
-
Click Add-ins, then click the XFDoc Builder button.
-
In the XFDoc Builder dialog box, select Task Word (Document) as a content item.
-
Select the file to be inserted, then click Insert.
-
Select the next blank line in the document, then press Enter to move to a new line.
NOTE: Inserted files must be added on a separate line within the combined document.
-
Repeat steps 8-11 as necessary to insert all documents.
-
Save the document.
NOTE: When saving the document in the same file location with its previous name, select the Replace file option when prompted.
-
Close the document.
-
Complete the steps documented in Check In and Publish a Document to check in and publish the document.
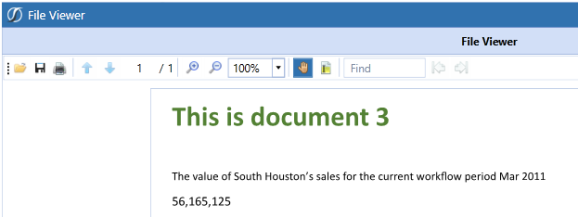
This example shows a combined document.